Saturday, April 24, 2010

Soft Flex Tranquility Necklace

I finally got around to photographing a necklace I made about a week and a half ago:
Purple and Blue

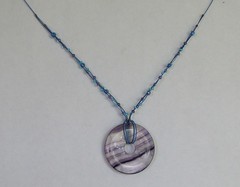
This is the necklace I had made when I posted about the various numbers of strands of Soft Flex that could be strung through seed beads. I used the Tranquility trio pack (shades of blue) for this design along with various blues and purples of seed beads.

Pendant of Purple

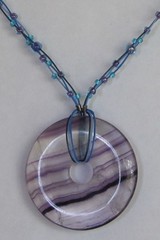
The design started with the pendant, which was a gift from my mom awhile back. I'd first wire wrapped it with coiled wire which I wasn't to happy with. Then after I had picked out the Soft Flex blue beading wire I figured that would work well with this pendant.

Closeup Wires

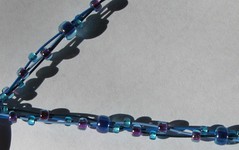
Here is a closeup of the strands of beading wire with the beads. The little blue beads are size 11 and fit over one strand. The purple lined blue beads are size 8 which fit over two strands. And finally, those large dark purple/blue beads are size 6 aka "E beads" and fit over all three strands.

Note on the images: I used my Flickr account for these, clicking the images will take you to the picture's own Flickr image page. If you want to see the image full size, click the "all sizes" icon above the picture. It should default to full size, but if not click on "large".

Materials:
Stringing wire - Soft Flex Tranquility .019 inches in diameter
Crimp tubes - Size 2 base metal variety pack
Size 11 beads - ToHo Silver lined dark aqua
Size 8 and 6 beads - Most likely ToHo's as well, I've had these in my supplies awhile.
Pendant - Glass doughnut, was a gift.

Friday, April 16, 2010

Bead strining wire and seed beads

Yes, no pretty picture for this post, and it's a short one to boot. Sorry about that.

Anyways, I recently was stringing three stranded necklace with a pendant and seed beads. I used different sizes of beads which gave the necklace a fun look. I figured it would be good to share how many strands could fit through the various bead sizes, which is handy to keep in mind while planning a design. Especially if you would need to buy supplies. (Having stuff on hand it is easy enough to quickly check what fits).

For the stringing material I was using Soft Flex, their Tranquility trio. The wire has 49 individual strands and is 0.019"(0.49mm) diameters thick.

For the seed beads I was using my current supplies, and I'm pretty sure all of them are Toho brand (the 8 might not have been).
Size 11 bead - fits 1 strand of stringing wire
Size 8 bead - fits 2 strands of stringing wire
Size 6 (aka "E") bead - fits 3 strands, with a bit of wiggle room.
(For seed beads the larger the number, the smaller the bead)

With the design I have all three strands holding the pendant, and aside from by the pendant and to finish the ends, I didn't use any crimps. The strands themselves I strung through various numbers of beads *points up*.

Thursday, April 15, 2010

New look soon

Quick post of posting. Pretty much I've been thinking about giving this blog a makeover to move away from the Blogger template (the dots do make me think of beads though) and have something that fits me and this blog. Maybe next week I'll start working on something, which might make for some interesting colors/fonts while I'm in the process of updating. At least I have an old private blog I can test stuff on.

I started with my writing blog, seeing as how I already had some graphics to work with from my writing web site. Not that I'm going to go to graphic heavy, but I do want to have something fun.

Friday, April 9, 2010

Goodies!

Well, the order I placed Wednesday afternoon over at Rings and Things arrived in the mail today and I'm all excited. There's nothing quite like the rush of playing around with various bead and findings letting design ideas run through my head. I figured I'd post about some of the fun stuff I picked out, rather than tweeting about every last thing in my excitement. ("Cabs" and "Bezel" and such are probably unknown words to my non-bead followers on Twitter).

Of course I had to try out the Bezel Lace first. I bought the half circle one as it was a good fit for the size of the cabochons (cabs) I bought awhile ago. I cut a piece with my wire cutters, and pushed it around a cab to shape. Then I used my chain nose pliers to bend the lager circles for the back of the cab, and slightly bent the smaller ones to fit the front. I still have to wire wrap the top loops to close it, but it looks like it will be a perfect fit. It was fun to work with, and it looks really great with the cab.

I also bought some Soft Flex Trios bead stringing wire the Tranquility pack. Trios are packs of three different colors, which is nice to expand the colors I have on hand. Tranquility is various blues; tanzanite, lapis, and blue topaz. So far I've only opened the packaging on these, but it's enough to see how nice the colors are.

I also bought various beads, which I'm starting to get some design ideas. Part of me thinks it would be fun to blog about the design process as I'm working on it, then post some in progress pictures as I get to the assembly stage. But some of the beads I bought are for gifts, and contests, so I wouldn't want to ruin any surprises. Though maybe I could do something with the cab, or the glass memory-box style pendant would be cool to. I have a few ideas what to put inside it.

Wednesday, March 31, 2010

Because I like where I shop

Work in Progress Ever ask someone where they purchased a particular component of piece of art they put together and gotten a vague or non response? That's happened to me once or twice that I remember, and I find it annoying. As an artist buying components to a piece I'm working on is only the start. Where my creativity comes in is how I decide to use said components, and how well I can put that design together. It's a combination of design and craftsmanship that carries a piece of jewelry, or other handcraft. And yes, design includes choosing which components to use.

When I post my creations on my blog, or various online communities, I like to cite my sources of the materials I used. I may not always be good about naming my supplier specifically, but I like to give enough information so anyone interested could buy similar parts. Well, when it comes to my blog, I do have a blog roll feature for the blogs of the businesses I buy from. I don't like to buy into the mindset of "if they know where I got X Y and Z then they'll copy my super cool design". On the flip side I'm not naive enough to think that design copying doesn't exist either (but that's not really the topic of this post).

When it comes to the level of transparency one has about their suppliers there is a point I do want to make. When you tell people where you buy your supplies, then they can also buy from your supplier(s), increasing the sales your supplier makes. And when your supplier sells more stuff, it's better for their bottom line. I don't know about other people out there, but I'd like to see the suppliers I buy from stay in business.

And related to the topic of transparency, I am interested in helping out other artists learn new skills. I'd like to think that the jewelry I create (my style if you will) goes beyond the list of components I use. I do plan on posting some tutorials at some point here, expanding on the few tips and tricks I've posted in the past.

Note: Yes the photo is old, from earrings I made back in January. This happened to be a relevant image that I already had uploaded (lunchtime blogging). The big loops I made with wire from my local bead store (20 gauge copper), the copper bicone beads are from Rings and Things, and the topaz cracked Czech glass beads and Swarovski crystals are from Artbeads.

Friday, March 26, 2010

Found the Jump Ring Inspiration

Just a short post before company comes over tonight. I mainly wanted to share the inspiration for trying a chainmaille bezel with one of my new cabochons.

Polka dot by night Earrings (Over in the Rings and Things Gallery), use Swarovski rivoli stones. The jump rings used in this design catch the facets quite nicely. Now my cabs lack said facets, so I'll have to experiment with different weaves to hold them well. I'm thinking of European 4 in 1 with smaller rings. I'll keep my blog updated on the progress/attempts.

Wednesday, March 24, 2010

DIY Polyclay Cabochons

So, last week I was glancing over at my clay bin which was on the dinning table, and noticed my little plastic palette sitting next to it. I had one of those light bulb flashing idea moments, thinking how much the little wells of the palette are shaped like a round cabochon (aka "cabs"). I hadn't even been planning on working with clay that night, but the idea was exciting enough that I had to set up a little work area at the table and start rolling the clay.

Yes, I took photos when I was done, so these are all finished. Here is my pallet with the cabs on/around it, along with a US nickle for size comparison. (how handy).


The next image shows all three cabs along with the nickle. Two I made with the same marbling technique where I twisted ropes of clay together several times. This made for the larger more prominent color pattern. The third cab I rolled the clay first into thin sheets and then rolled the sheets together and twisted from there. That's why the third cab has a very subtle color pattern to it.


Another shot of the rope twisted cabs. The smaller one was left over marbled clay after I molded the first one. It wasn't quite enough clay to fill the well, but it ended up round enough for this trial run.


So what's next? Why bezels of course. I want to try a bead stitched bezel on one, and also try doing something with chainmaille on another. Depending how that works I'll figure out what to do with the third. I may even just buy a glue on bail.