Showing posts with label necklace. Show all posts

Friday, March 25, 2011

Walking on Sunshine

And don't it feel good :)

Yes, I couldn't help it. I've had this song stuck in my head since I decided to buy the Walking on Sunshine crystal jam. And here's more of what I've made with it. They were more of a 'garnish' if you will on the leaf necklace, for these pieces the crystals are a more integral part of the designs. The earrings came first then I made a necklace to match.

For the earrings I strung the crystals on yellow Soft Flex to bring out the fun warm tones of the crystals.

And here is the necklace. In addition to the crystals I added some Czech glass beads and some little peanut shaped clear beads. I had hoped that the yellow Soft Flex would show through the peanut beads, but that didn't go quite as planned. I still like how this turned out though.

The whole necklace. I used some of my curb chain to make an extender, putting a glass round bead on the end for the clasp to catch if it misses a link. I like making my own extenders with the handy spools of chain from Rings and Things. This curb chain has soldered links, which adds strength. I have some extenders I picked up locally which have broken because they don't have soldered links.

Saturday, March 12, 2011

Finished Necklace

From the work in progress I posted earlier, here is the finished piece.


That's what the whole necklace looks like, with the beads all the way around.


And here is a close up shot of the pendant portion of the necklace. I'm not sure why, but Blogger rotated it on me in the upload process.

Off topic, but I decided not to try posting via my phone this time around. I used the camera for better pictures, then I put the SD card into my netbook. I love how the netbook has the SD reader, and using the Windows 7 version of MS Paint worked pretty well for resizing/cropping the images. Well it wouldn't let me use the crop button. I ended up selecting the whole image, moving it up and to the left, then dragging the canvas to where I wanted to "crop" the bottom and right side.

Thursday, January 6, 2011

Crystal Filigree Necklace

When I saw the Swarovski filigree over at Rings and Things I decided I wanted to try working with them. So I purchased the one in this necklace, with no idea what I would do with it. Then as I was making gifts last month I decided to hang the filigree as a pendant. It's attached with a smaller jump ring so the E beads hold it in place.

Materials:
Swarovski filigree
Czech E beads - crystal color
Mocca Swarovski pearls
Czech fire polished faceted rounds
Little silver colored spacers
Soft Flex Extreme silver

I have two more filigree in my cart right now and I'm planning on trying a multi strand design. I'll probably do a bracelet first, then try making a choker. The choker I won't be able to wear for awhile as it's turtleneck weather right now. But that's alright, I'm looking at one of the floral shaped filigree for the choker so it will be a nice spring necklace.

Sunday, December 12, 2010

Gemstone Necklace

I got the idea for this necklace from my Bead Journey book (ISBN 978-0-87116-267-0) which I modified slightly. I had been wanting to do more work with stones, and this was a nice opportunity to do so.


(Both images are scaled down for this post). My camera was running low on batteries so I ended up taking quick shots, and luckily a few came out alright. It didn't help that it was snowing last week so I didn't have to much natural light to work with.

Supplies:
All the stones are Sodalite:
Pendant is - 20x39mm Puffed Marquise
Rest of stones necklace earrings - 6mm Rondelles 
Spacer 1 - 4mm Glass Disk -Aquamarine
Spacer 2 - 4mm Filigree - Antiqued Copper Plated
Eye pin and earring findings are from a kit my mom gave me last year as a gift.
Strung on Bone Soft Flex 49 strand (Via a Trio Pack)

When I was planning this necklace I had decided to use the glass spacers in place of the gold ones from the design in the book. As I was sorting through my order I realized how nice the filigree beads looked with the stones. I debated using the filigree instead of the glass and spent a bit of time looking at strung samples. I decided that I liked the way the glass picked up the light while nestled between the stones and decided to alternate the spacers.

If anyone else wants to try this design it's best to put the marquise stone on a head/eye pin. My first attempt I strung it with the beads and it kept shifting sideways due to it's shape interacting with the beads. Though a top drilled marquise would be alright to string directly with the beads.

Monday, November 8, 2010

Fall Necklace

 I made this set awhile back and finally got a chance to upload the images. The necklace is choker length and the bracelet is about 6 and a half inches long. I used 6mm translucent Czech glass beads, 4mm Swarovski crystals. The crystals are light topaz, moonlight, crystal copper, and fire opal. The glass beads are orange and dark topaz. These are both strung on medium Soft Flex, the red from my sophisticated trio. I also made the extenders from a spool of chain I bought from Rings and Things. I like being able to make my extenders rather than always using the pre-made ones. This is another version of my double stranded beading wire designs.

(And ya, the formatting on this post is weird - it's tricky working with the post editor on my netbook. Only so much screen space and no mouse. Though blogging away from my desktop is nice.)

Saturday, September 25, 2010

Appletini Mini-Lariat

Wrap Around
Back in the spring I purchased the Appletini bead mix from Rings and Things to make a miniature lariat. I say mini here because this is only 3 feet long, lariats are usually at least 4 feet. I did also add in a few seed beads from my stash, along with fiber optic beads and Swarovski crystals. The crystal at the end is one of Swarovski's sew on twists.

For the stringing material I used medium49 strand Soft Flex, two different colors. The light blue is from the Tranquility trio, and I think the light green is from the Serenity. I had used two different trios for this necklace.

Aside from the ends of the necklace I used an alternating design to show off the beading wire. The beads look continuous due to the dual strands, but there is exposed wire with a bead or two floating on it. The 6mm green fiber optic beads hold both strands of wire.

Full View Here is what the whole necklace looks like. The exposed beading wire is visible in the larger version of the photograph (clicking the thumbnail leads to the Flickr photo page).


Ends And a picture of what the ends of the necklace look like. I started with the crystal end, joining the two pieces of beading wire then attaching them to the crystal. From there I beaded the loop and the rest of the necklace. For this pattern I worked on both wires together, alternating which one had a floating bead.

Monday, August 23, 2010

Necklace of Reuse

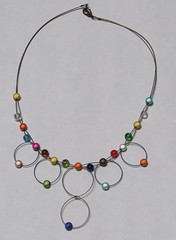
Leftover Necklace In one of my more recent designs I was able to reuse some scraps of Soft Flex I had leftover from other projects. I started this necklace with the loops, using a dark blue for the single ones, and antique brass for the double. The beads on the loops are miracle beads and are all made from my saved pieces of Soft Flex. The main part of the necklace I also used the antique brass color and alternated the miracle beads with glass Czech beads (both are 6mm rounds - I purchased assorted color packs/strands from Rings and Things awhile back).

This one wasn't all that hard to put together once I came up with a design. I started with the loops first, stringing two beads then crimping the loop closed. Once I had the loops finished I doubled up a long piece of Soft Flex so I had the two strands to work with. For the loops the necklace went through one of the beads while I let the other slide to the bottom of the loop. The miracle beads have nice large holes, they even slide over the crimp tubes I used.

So for anyone wanting to share, how have you reused materials leftover? Be they few extra beads, a bit of wire, or other findings.

Saturday, April 24, 2010

Soft Flex Tranquility Necklace

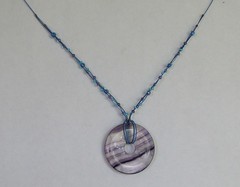
I finally got around to photographing a necklace I made about a week and a half ago:
Purple and Blue

This is the necklace I had made when I posted about the various numbers of strands of Soft Flex that could be strung through seed beads. I used the Tranquility trio pack (shades of blue) for this design along with various blues and purples of seed beads.

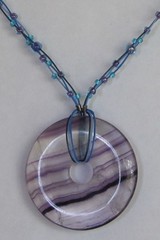
Pendant of Purple

The design started with the pendant, which was a gift from my mom awhile back. I'd first wire wrapped it with coiled wire which I wasn't to happy with. Then after I had picked out the Soft Flex blue beading wire I figured that would work well with this pendant.

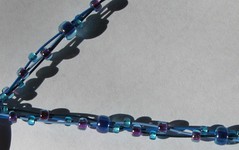
Closeup Wires

Here is a closeup of the strands of beading wire with the beads. The little blue beads are size 11 and fit over one strand. The purple lined blue beads are size 8 which fit over two strands. And finally, those large dark purple/blue beads are size 6 aka "E beads" and fit over all three strands.

Note on the images: I used my Flickr account for these, clicking the images will take you to the picture's own Flickr image page. If you want to see the image full size, click the "all sizes" icon above the picture. It should default to full size, but if not click on "large".

Materials:
Stringing wire - Soft Flex Tranquility .019 inches in diameter
Crimp tubes - Size 2 base metal variety pack
Size 11 beads - ToHo Silver lined dark aqua
Size 8 and 6 beads - Most likely ToHo's as well, I've had these in my supplies awhile.
Pendant - Glass doughnut, was a gift.

Saturday, February 20, 2010

New Camera!

My husband and I got a new camera, to replace the previous one which is pretty much shot. The light sensor isn't functioning, and the model is old enough that Olympus doesn't carry parts to fix it anymore. That's alright, we'd gotten plenty of use out of the old camera.

To celebrate the new camera, I decided to enter the "Your Designs Rock" contest over at Rings and Things. I sketched out a design earlier this month, then ordered parts from R&T the other week. Thursday I finished the necklace and earrings and will be working on submitting the pictures to the contest. I had been tempted to enter earlier, but with the camera issue I wasn't sure.

Showing off what the new camera can do:

Now this isn't the piece I'm entering in the contest. I am going to wait to show it off until later. This necklace I made back in October with beads I bought with birthday money. The lovely agate stone I picked up from my local bead store. I also made matching earrings, which I didn't take pictures of yet.

The light wasn't the best today as it's a bit overcast, but the pictures for the contest turned out well. This particular necklace didn't do to bad considering it has quite a bit of dark purple in it. As we get more settled into the house I do want to set up a light box for my jewerly pictures to decrease my dependency on sunlight. (It's now light out when I get home from work during the week, but the sun is low enough that I'm still waiting for weekends to get decent light).

Here's a close up of the stone with the second strand above it. I used silver colored copper wire to hang the stone on and did a coil at the bottom. For this shot I hung the necklace on the display stand I made this morning. I cut apart a cardboard box then covered it with some printer paper. My contest necklace has enough little hanging pieces that it photographed better not laying flat.

The only editing I did with these images was cropping and resizing.

Sunday, January 17, 2010

Chainmaille Set

Well, long time no post. Now that the holidays are over and I'm getting back into my usual routine here is something I've recently made. I started working on this set back in December, between Christmas gifts for friends and family. The choker is 14 inches long, with a bit of an extender chain built in, and the earrings are about an inch or so long.

The weave on these is European 4 in 1, which is a standard maille weave. The double colored diamond pattern I found in a beading magazine I picked up two summers ago. I'm not sure of the ring sizes they had recommended, I ended up picking out sizes and colors at my local bead store that I figured would work well. I've done this pattern before with these size rings, and I've had good luck. These rings work especially well with the earrings. When making a bracelet with larger rings, a single diamond unit felt a bit to heavy to be an earring, but these ones are light weight enough.


Here are the earrings, the same rings as I used with the choker. The earring findings I've had awhile now, and they happened to go well with the rings.

For the rings, I used D20 EC. The AR is 4, D is 1/8 of an inch, and they are made out of 20 gauge wire. They aren't labeled as to what metal they are made out of, but they look like aluminum (I cut one in half, it's not copper, and to soft to be steel).

As I unpack from moving and find the magazine I'll post the details for that issue so others can find the pattern. (Not that it's that complicated). The trick to the diamonds is to have the last row of rings facing the same way as the first row in the next diamond. That way they are less likely to twist around. I'm not counting the single connector ring as a row here.

Tuesday, December 22, 2009

Purple Stoneware and Silver Necklace

One of the necklaces I made as a gift, which was given today, so I'm posting pictures. This one started with the purple stoneware beads, and it took awhile for me to decide what to do with them. While looking through my recent purchases, I realized that they looked nice with the silver-plated chain I bought. From there I decided to do some wrapped loops to have some Swarovski crystals with them.

The necklace is 18 inches long, counting the clasp.

Materials:
Stoneware beads
Swarovski 6mm faceted clear rounds
Silver plated twist link chain
Teal jump rings
Silver Plated lobster clasp
Craft wire - probably 22 gauge (Yes, this wire was a gift, and the only labeling the package says is "blue craft wire".)

Saturday, December 12, 2009

Green Wire Coil Necklace


Here is the necklace I made earlier this week. I'm happy with how the necklace turned out, and the pictures as well. The family room was nice and sunny, and I set the necklace out of the direct sun for the better photos. When it was in the sun, the shadows from the coil covered up the center of the pendant.

The image of the whole necklace is to the left, click on it for a larger version. The pictures are taken on my bead board, the numbers are for inches, with smaller "hash" lines for half inches.


Here is a picture of the necklace chain (again click the image for a larger version). I had fun making the various little segments then connecting them with the jump rings. Because the necklace is lighter weight, and I'm using 20 gauge wire, I did simple loops at the end of the segments instead of wrapped loops.

For the end of the necklace I used a silver plated clasp, and also put together an extender chain out of the jump rings. This way the necklace length can vary a bit. Whenever I make a little chain extender, I like to have something on the end, so that the clasp doesn't slide if goes around the rings instead of hooking onto one. With the ring size and the clasp, this probably won't happen with this necklace, but it still adds a nice touch. For the end of the chain I coiled my copper wire, strung a 6mm Czech glass bead, and looped the end.

Materials:
For the coil pendant and the beaded segments in the chain I used 20 gauge copper wire. I bought it from my local bead store, and it has an anti-tarnish finish on it. The seed beads I used are Toho brand, which I purchased online from Artbeads.com, I like that brand of beads, they are nice and even sized. When I made a similar necklace to this with random seed beads it took forever to string the beads on the wire. Because the size 8 beads just fit, any random smaller bead that gets stuck I have to set aside and grab another bead. But I didn't have that issue with the Toho beads. The bigger teal/blue beads on the chain are also Toho, but size 6. I also included some 6mm Czech glass rounds on the chain. The rings are from my local bead store, size D20EC 20 gauge with an AR of 4.0. I also used a few Swarovski Elements, bicone Erinite color 4 and 6mm.

To make the coil I used my coiling gizmo, which is sold various places. I strung the beads on the wire, then used the gizmo to make the coil, which I then shaped into the pendant. If anyone does want to try making something like this, be very careful when coiling beaded wire. As the wire turns the beads will slide slightly apart from each other. The first time I made one of these (this being the second), I put to much tension on the beads to keep them coiling, and one broke, the pieces flying away from the wire. Though the beads do need to be pushed a bit towards the coiling gizmo, otherwise only the wire will go around the shaft leaving bare spots.

Tools:
The coiling gizmo, chain nosed pliers (times 2 - for the jump rings), round nose pliers, flush cutters, nylon jaw pliers. I do make my wire spirals by hand, starting the turn with my round nose pliers, then pinching the half turn closed with chain nosed. I do a few turns with the chain nose, then switch over to the nylon jaw pliers.

Yes, I had help with the picture taking process. Toby, one of our cats, followed me into the family room and was sitting on the furniture while I was taking pictures. Here he is taking a closer look at the necklace.